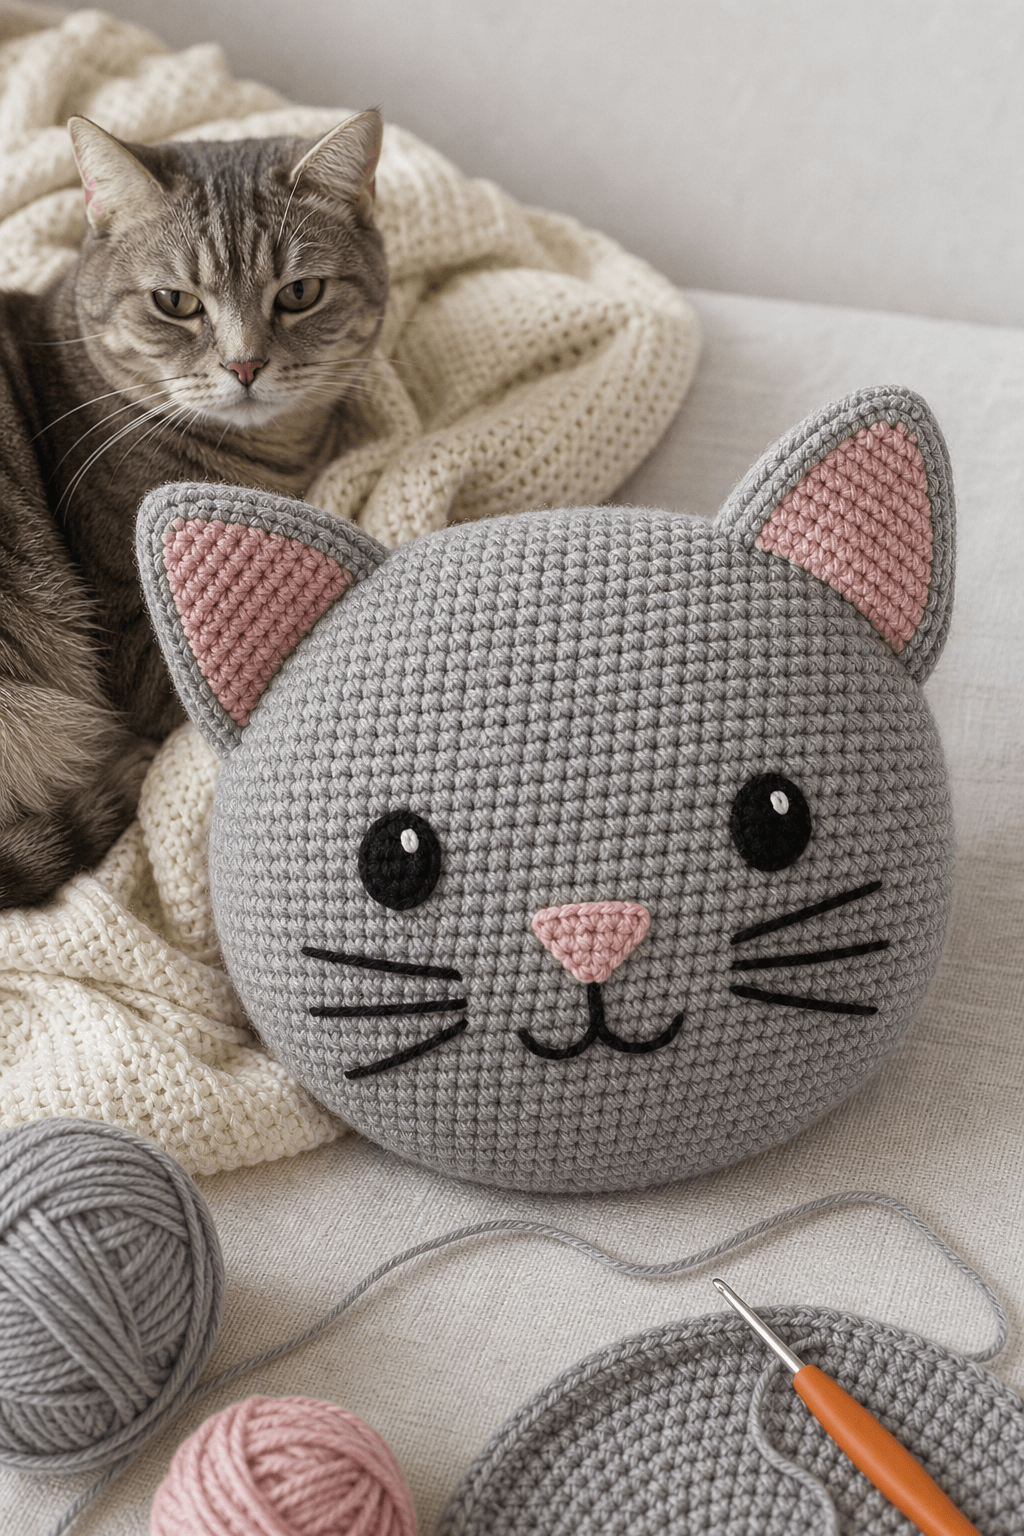
Making a cozy cat pillow is one of the most rewarding beginner crochet projects you can tackle. This crochet cat pillow pattern walks you through creating an adorable stuffed cushion shaped like a sitting cat, complete with perky ears and a sweet face. Whether you stitch it for yourself or gift it to a fellow cat lover, you’ll love how quickly this project comes together.
Pattern Overview
This crochet cat pillow pattern creates a plump, huggable cat cushion in a simple sitting pose. The body is worked in the round from the bottom up, the ears are crocheted separately and sewn on, and the face is embroidered with basic stitches. The finished pillow measures roughly 10 inches tall and 8 inches wide, making it the perfect size for a couch throw pillow or bed accent. You’ll use basic stitches like single crochet, half double crochet, and double crochet to build a soft, squishy texture.
Skill Level
Beginner to Easy. This crochet cat pillow pattern requires only fundamental stitches and shaping techniques. You’ll work in the round and use simple increases and decreases, making it perfect for anyone who has completed a few basic projects. If you can make a magic ring and work single crochet and double crochet stitches, you’re ready to start.
Finished Size
The finished crochet cat pillow measures approximately 10 inches tall and 8 inches wide at the widest point. The exact measurements depend on your yarn weight, hook size, and how firmly you stuff the pillow. Using worsted weight yarn and a 5.5mm hook will give you the size listed above. If you use thicker yarn and a larger hook, your cat will grow bigger. If you use thinner yarn and a smaller hook, you’ll create a smaller companion.
Materials
- Yarn: Worsted weight yarn in your main color (light gray, white, cream, or any cat color you prefer), approximately 300-400 yards; small amounts of contrasting yarn for face details (black, white, pink, or your choice)
- Hook: US size I-9 (5.5mm)
- Notions: Fiberfill stuffing (about 8-10 ounces), yarn needle, embroidery needle, stitch marker
- Optional supplies: Polyester pellets for weight (instead of or combined with fiberfill), safety eyes (8mm-12mm size) as an alternative to embroidered eyes, tapestry needle for easier weaving in of ends
Abbreviations
| Abbreviation | Meaning |
|---|---|
| ch | chain |
| sc | single crochet |
| inc | increase (usually 2 sc in the same stitch) |
| dec | decrease (single crochet 2 together) |
| hdc | half double crochet |
| dc | double crochet |
| sl st | slip stitch |
| st(s) | stitch(es) |
| rnd | round |
| row | row |
| sp(s) | space(s) |
| yo | yarn over |
Gauge
Working 16 sc over 4 inches on US size I-9 (5.5mm) hook in worsted weight yarn. Gauge matters for this pattern because it affects the finished size and the firmness of your pillow. If your gauge is too loose, your cat will be larger and floppier. If your gauge is too tight, your cat will be smaller and stiffer. Before you begin, crochet a 4-inch swatch in single crochet, measure the stitch count, and adjust your hook size as needed.
Pattern Notes
- This pattern uses US crochet terminology throughout.
- The crochet cat pillow is worked in the round for the body, with ears and optional tail created separately.
- Use a stitch marker to mark the beginning of each round so you don’t lose track of where rounds start and end.
- Stuff the pillow firmly as you work to prevent lumps and create a plump, huggable shape.
- When you encounter a magic ring, if you’re unfamiliar with the technique, you can substitute by chaining 2 and working into the first chain instead.
- The face is embroidered after assembly, making it easy to customize the expression.
- If you prefer, swap embroidered eyes for safety eyes before closing the last seam.
Crochet Pattern Instructions
Body (Worked in the Round)
Rnds 1-4 (Bottom Section)
- Create a magic ring and ch 1.
- Rnd 1: 8 sc in the magic ring. Do not join; use a stitch marker to mark the start. (8 st)
- Rnd 2: Inc in each st around. (16 st)
- Rnd 3: Sc 1, inc repeat from * around. (24 st)
- Rnd 4: Sc 2, inc repeat from * around. (32 st)
Rnds 5-12 (Main Body)
Work 8 rounds of sc 32 with no increases or decreases. This builds the height of the body and creates the sitting pillow shape.
Rnds 13-16 (Decreasing Top Section)
- Rnd 13: Sc 2, dec repeat from * around. (24 st)
- Rnd 14: Sc 24. (24 st)
- Rnd 15: Sc 1, dec repeat from * around. (16 st)
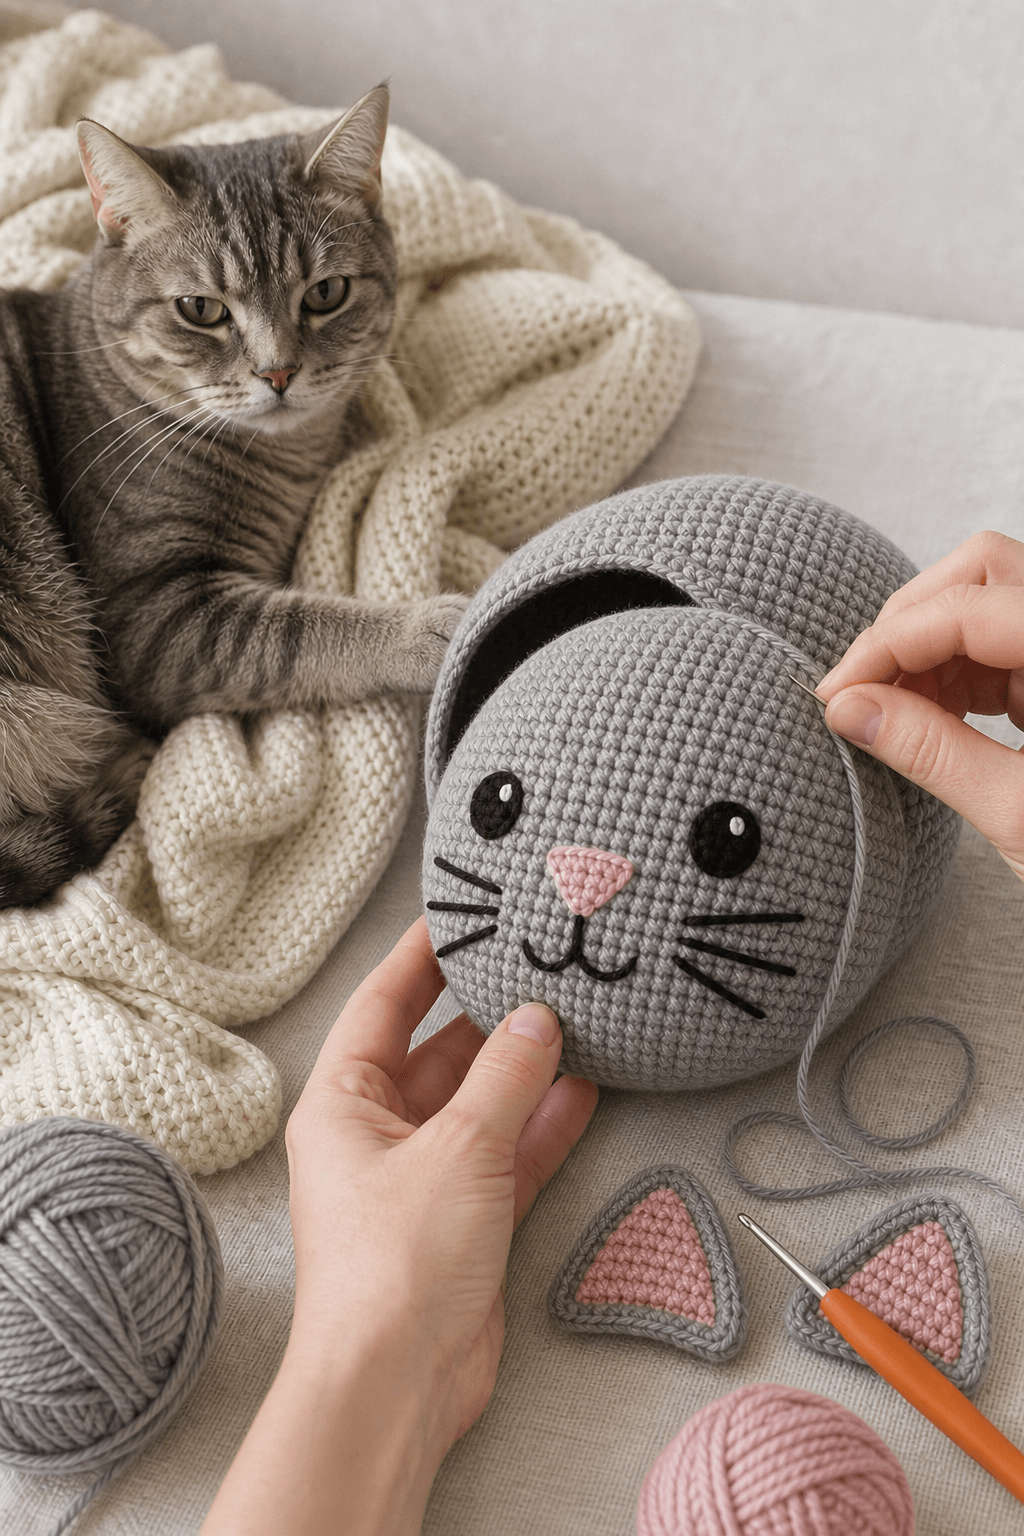
- Before Rnd 16, stuff the pillow firmly with fiberfill. Add extra stuffing now while you can still reach inside.
- Rnd 16: Dec around until the opening is very small, fasten off leaving a 6-inch tail for sewing shut. Weave the tail through the remaining stitches and pull tight to close the opening.
Ears (Make 2)
- Ch 5.
- Row 1: Sc in the 2nd ch from the hook, sc in each ch across. (4 st)
- Row 2: Ch 1, turn, sc 4. (4 st)
- Row 3: Ch 1, turn, dec, sc 2. (3 st)
- Row 4: Ch 1, turn, sc 3. (3 st)
- Row 5: Ch 1, turn, dec, sc 1. (2 st)
- Fasten off, leaving a 6-inch tail for sewing.
Each ear should look like a small triangle. Make two identical ears.
Optional Tail
- Ch 20.
- Sc in the 2nd ch from the hook and in each ch across. (19 st)
- Fasten off, leaving a tail for sewing.
The tail can be curled or left straight. Some crocheters skip the tail entirely for a more minimalist look.
Assembly and Finishing
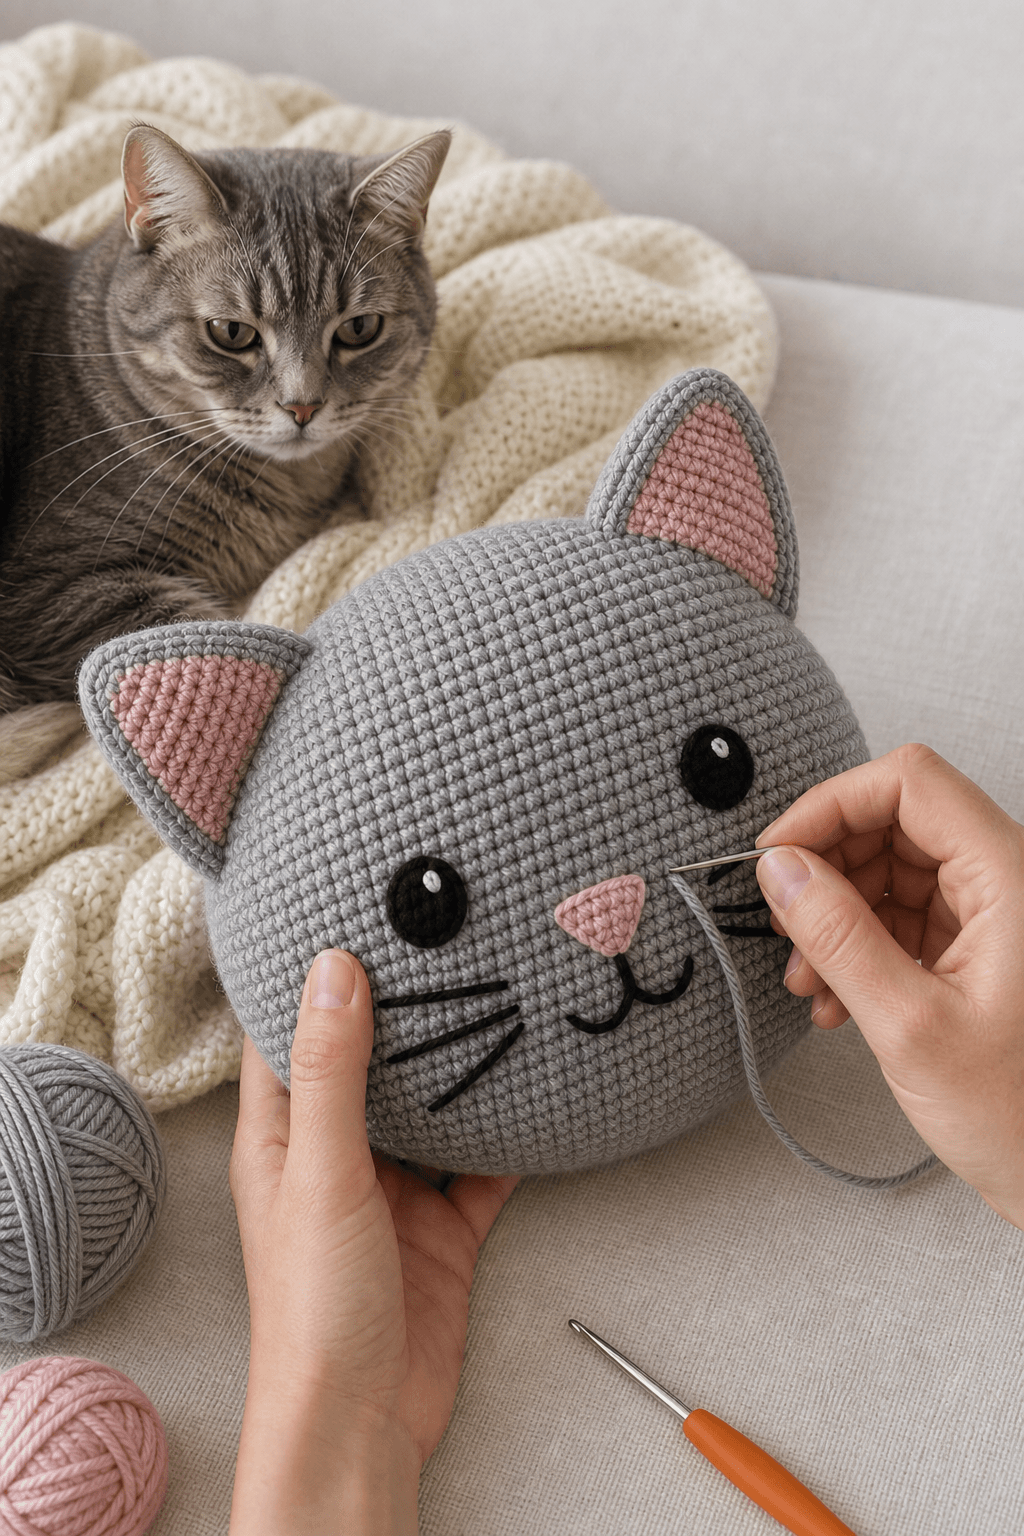
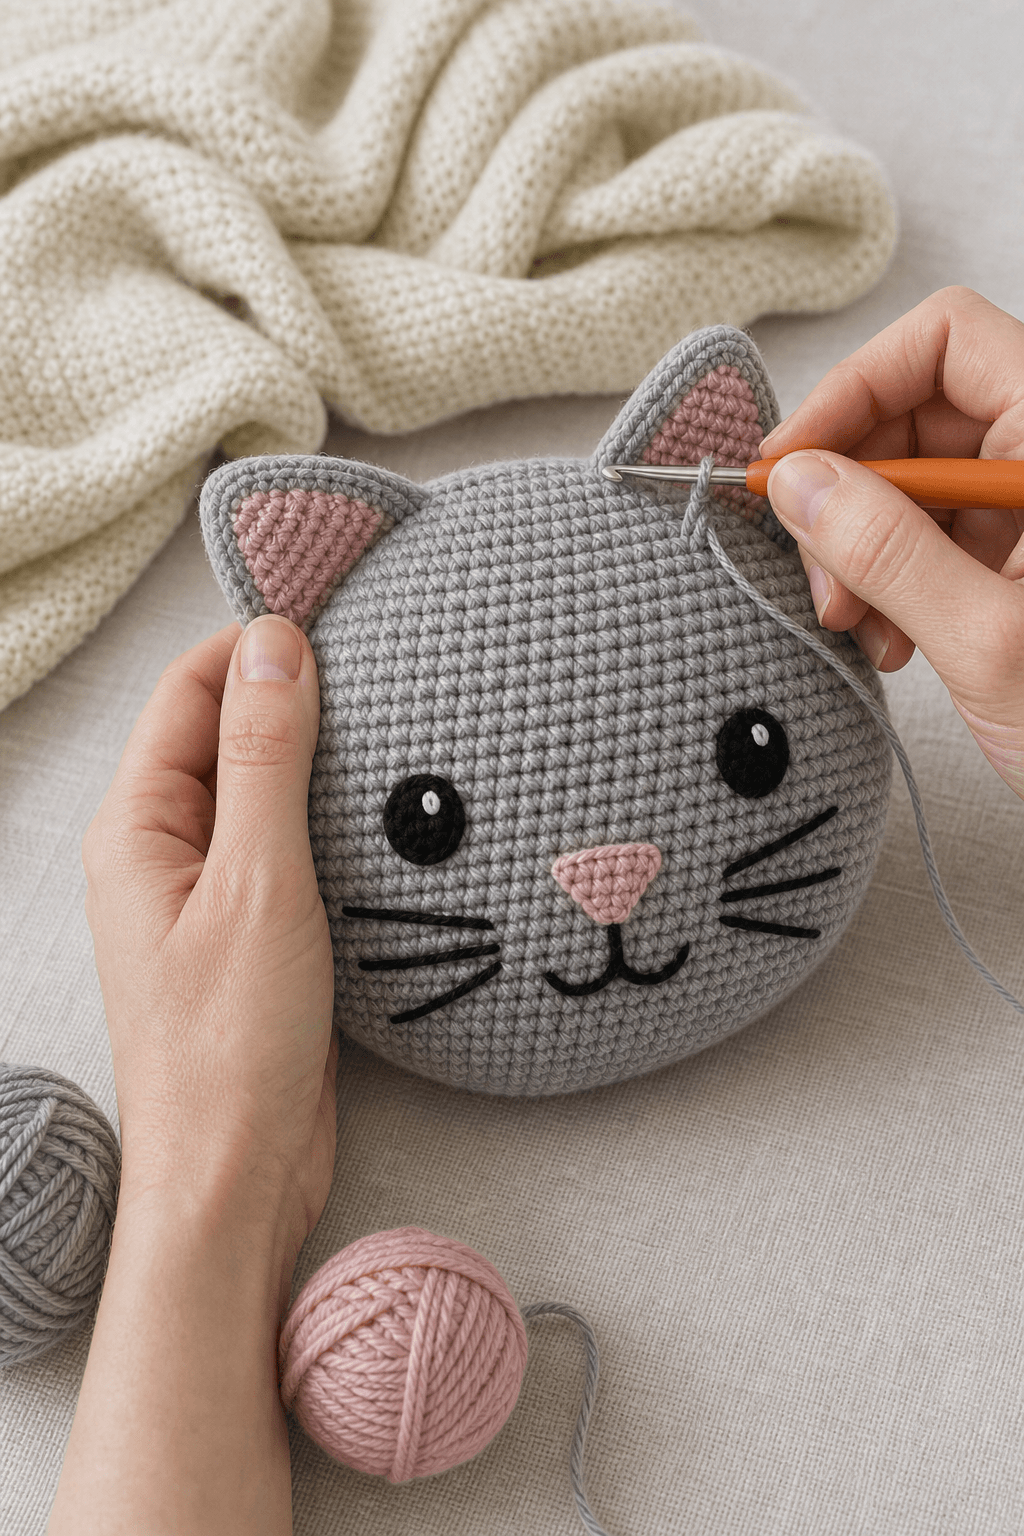
Attach the ears: Pin both ears to the top of the cat pillow head, spacing them evenly. Use your yarn needle and the tails left on the ears to sew them securely to the body. Take several stitches through each ear base to make sure they won’t come loose. Weave in the ends.
Attach the tail (if making one): Pin the tail to the back bottom of the pillow. Sew it on with several stitches and weave in the ends. You can sew it curled or coiled for extra charm.
Embroider the face: Use black yarn and your embroidery needle to stitch two eyes. Use simple French knots or small circles for eyes. Stitch a pink or black nose in the center, and add a small mouth with a few stitches. You can also use safety eyes if you prefer a more finished look (attach before stuffing).
Weave in remaining ends: Use your yarn needle to weave any remaining tails into the body so they won’t stick out.
Your crochet cat pillow is now complete and ready to display or gift.
Customization Ideas
- Color variations: Make your cat in orange for a tabby, black for a sleek panther cat, or pastels for a whimsical dreamy look. You can even striped or color block the body.
- Size adjustments: To make a larger cat, use bulky weight yarn and a larger hook (US size K-10.5 or L-11). To make a mini version, use DK weight yarn and a smaller hook (US size G-6 or H-8).
- Face expression: Change the embroidered expression by moving the eye placement or adding rosy cheeks with pink thread. Draw a sad mouth for a pouty cat or a wide smile for a cheerful one.
- Edging: Add a crochet border around the bottom or a ruffled edge along the sides for a fancy look. A simple shell stitch or picot edge adds visual interest.
- Embellishments: Stitch a little bow tie or collar around the neck area. Add appliqued paws on the belly with contrasting yarn. Embroider spots or stripes on the body.
- Alternative fill: Mix fiberfill with polyester pellets to make a heavier, more weighted pillow that sits better on furniture.
Care Instructions
- Hand wash your crochet cat pillow in cool water with mild detergent.
- Gently squeeze soapy water through the fabric; do not wring or twist.
- Rinse thoroughly in cool water until all soap is gone.
- Gently squeeze out excess water and lay flat to dry on a clean towel.
- Once mostly dry, you can reshape the pillow if needed and allow it to air dry completely.
- Avoid machine washing, bleach, and high heat to preserve the yarn and stuffing.
- If embroidered details fade over time, you can re-embroider them to refresh the face.
Troubleshooting
My pillow came out lopsided or wobbly
This usually happens when stuffing is uneven or the base rounds were too loose. Next time, distribute fiberfill evenly as you go, adding small amounts in stages rather than all at once at the end. Also double-check your gauge on a swatch before starting. If your current pillow is still soft enough to manipulate, you can open a seam, redistribute the stuffing, and re-sew it.
The ears won’t stay upright or keep bending over
Make sure you stuffed the ear bases lightly before sewing them on. You can also insert a small pipe cleaner or stitch through the ear base and body a few extra times to hold it in place. Some crocheters stiffen ears by adding a tiny amount of fiberfill or by sewing them at a different angle.
My seams are visible or messy
Use a mattress stitch or ladder stitch when sewing pieces together for an invisible seam. Weave your needle through the loops on both sides rather than straight through the center of stitches. Take smaller stitches for neater results, and use yarn that matches your body color.
The embroidered face looks uneven
Practice on scrap yarn first. Mark the eye and nose placement lightly with a stitch marker before committing to embroidery. Step back and view your pillow from arm’s length to assess the expression before finalizing any stitches. You can always re-embroider if needed.
Fiberfill is poking through the stitches
This means your gauge is too loose or your stitches are very open. Use finer yarn with a smaller hook for your next cat to create tighter, more densely packed stitches. You can also line the inside with a thin fabric before filling, though this adds extra steps.
Your new crochet cat pillow pattern project is now ready. This beginner-friendly pattern teaches essential crochet skills while delivering a cute, huggable result. Whether you make one cat or a whole litter in different colors, you’ll have a one-of-a-kind handmade piece to cherish. Happy crocheting!